Learn how the wintersowing method can help you to start seeds the easiest and cheapest way during the dead of winter. This seed starting method is perfect when you don't have the space inside to start any seeds. AlI while recycling some water/milk jug container and turn them into DIY greenhouses.
1. What are the advantages of wintersowing?
Wintersowing is a great way to start seeds, which doesn't require any seed starting space or equipment inside. It is fairly low cost and can be a great entry way into gardening for people who want to try out growing some plants without diving deep into the seed starting rabbit hole. But even if you have an indoor seed starting station it is still a great way to save some of that seed starting real estate on the shelf and literally outsource your cold hardy seedling outside.
Another advantage is the low maintenance of the approach. It is almost a 'set it and forget it'- type of activity. I say 'almost' because it depends on your winter climate and if nature provides you with sufficient moisture. Where I live in Southern Massachusetts, we have frequent rain or snow around this time of the year, so there is really nothing to do but to wait until the seedlings have grown to a nice size to transplant them.
Which leads me to the last advantage: They don't require any hardening off because they are perfectly acclimated to the real sun already.
2. What varieties work for wintersowing?
There are many varieties which work with wintersowing. Think about anything which is cold hardy, perennial or native plants which propagate via seeds or anything which you would usually use for your early spring vegetable garden. A lot of perennial plants require cold stratification for proper germination, which means that the seeds need to be exposed to freezing temperatures to be able to germinate successfully. Here are some varieties which work great:
Flower Varieties:
- Poppies
- Pansies
- Violas
- Calendula
- Strawflower
- Echinacea
- Snapdragons
- Bachelor Buttons/Cornflower
- Yarrow
- Statice
- and more...
And Vegetable & Herb varieties:
- Chamomile
- Cilantro
- Dill
- Mint
- Chives
- Onions
- Brassicas
- Spinach
- and more...
3. Milk Jug Method
The milk jug method is the easiest way to recycle your plastic container. Any kind of translucent or clear container like Ocean Spray Juice container work great. Make sure they are rinsed and clean to get started. Additional materials needed:
- Scissors/ Box cutter
- Potting Soil
- Duct Tape
- Seeds
- Label & Marker
(This post also contains affiliate links that help support my content creation efforts. I greatly appreciate your support)
Step 1 - Prepare the Container
First order of business: Cut drainage holes in the bottom of the container. A couple slits in the bottom are sufficient or you can use a hot glue gun and burn some holes with the hot nose into the plastic bottom. No matter what you do, please watch your fingers 😉
Cut the milk jug at the heights where the handle ends, so the bottom piece is about 1/3 of the container. Don't cut the top part fully off, but leave a corner attached. This will make it a lot easier to tape the lid back on when you are done.
Step 2 - Fill the Container
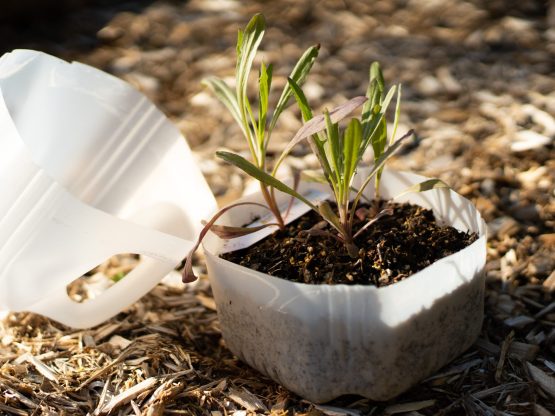
You can use any kind of potting soil you have around, no need to buy expensive seed starting mix. Fill the bottom part with soil and choose the seeds. I recommend to seed slightly heavier then the seed package indicates, but resist the urge to dump a full package into the jug, because you will be surprised by the germination rate which you will see. When I did it the first time, I didn't believe it will actually work, so I basically grew a chia-pet style of seed carpet in my jugs.
In a normal milk jug, I usually aim for 4 seedlings per jug which has worked well for me. Make sure you label them inside and outside of the jug, so you are always able to identify what you are growing. Once seeded, make sure you water the seeds and soil in well. That is also a good moment to check if your drainage holes are sufficient. You don't want to have water standing in the container. This will lead to rotting seedlings.
Step 3 - Close the Container and find a place outside
Tape the lid back on with the duct tape and make sure it is sturdy enough for you to pick the jug up at the handle to move around. I usually go around twice the jug with duct tape for good measure.
Place the jugs outside where they get plenty sunlight like you would do it with any other plant. I place my jugs on our deck in the corner, so I can see them and don't forget about them. And now we wait until approximately mid of March to see some seedling coming up, which will be ready to plant outside mid April in my Zone 6 here (weather-permitting). All of the above mentioned varieties, you can plant outside 3-4 weeks before your last frost date, which is for me in zone 6b May 15th. So, if you are in a different growing zone, please adjust the timeline to your zone.
You want to learn more about wintersowing check out these links:
Check out my Youtube Video where I show the process in detail and also show the version with a clear container.
Here is a great podcast episode from JoeGardener about winter sowing.
And if you are interested to learn more about seed starting check out my post about All things Soil Blocking.
Happy Gardening!